

Secure Shell (SSH) is a powerful protocol for securely accessing remote systems. This guide walks you through setting up and using SSH on Windows, from installation to connecting to a remote server. Whether you’re a beginner or an experienced user, this tutorial covers everything you need to know.
Step 1: Check if SSH is Already Installed
Windows 10 (version 1803 and later) and Windows 11 include a built-in SSH client called OpenSSH. To check if it’s installed:
- Open the Command Prompt or PowerShell by pressing Win + S, typing cmd or powershell, and hitting Enter.
- Type the following command and press Enter:
ssh -V - If OpenSSH is installed, you’ll see a version number (e.g., OpenSSH_for_Windows_8.1p1). If not, you’ll get an error like “‘ssh’ is not recognized.”
If SSH is not installed, proceed to the next step.
Step 2: Install OpenSSH Client on Windows
Windows provides an easy way to install the OpenSSH client via the Settings app or PowerShell.
Option 1: Install via Settings
- Open Settings (Win + I).
- Navigate to Apps > Optional features.
- Click Add a feature, then search for OpenSSH Client.
- Select it and click Install.
- Wait for the installation to complete. You may need to restart your system.
Option 2: Install via PowerShell
- Open PowerShell as Administrator (right-click Start menu > Windows PowerShell (Admin)).
- Run the following command to install the OpenSSH Client:
Add-WindowsCapability -Online -Name OpenSSH.Client~~~~0.0.1.0 - Verify installation by running:
ssh -V
For a visual guide, watch this YouTube tutorial on installing OpenSSH on Windows.
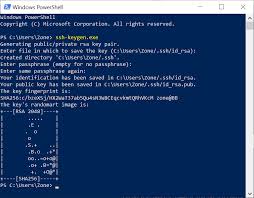
Step 3: Generate SSH Keys (Optional)
SSH keys provide a more secure way to authenticate than passwords. To generate an SSH key pair:
- Open PowerShell or Command Prompt.
- Run:
ssh-keygen -t rsa -b 4096 - Press Enter to accept the default file location (C:\Users\YourUsername\.ssh\id_rsa).
- Enter a passphrase (optional) or press Enter to skip.
- Two files are created:
- id_rsa (private key)
- id_rsa.pub (public key)
To learn more about SSH keys, check this video on SSH key generation.
Step 4: Copy Public Key to Remote Server
To use your SSH key for authentication, you need to add your public key to the remote server’s ~/.ssh/authorized_keys file.
- Copy your public key to the clipboard:
type $env:USERPROFILE\.ssh\id_rsa.pub | clip - Connect to the remote server using a password (replace username and server_ip):
ssh username@server_ip - On the remote server, create or edit the authorized_keys file:
mkdir -p ~/.ssh echo "your_public_key" >> ~/.ssh/authorized_keys chmod 600 ~/.ssh/authorized_keysPaste your public key (from the clipboard) in place of your_public_key.
Alternatively, use ssh-copy-id if available:
ssh-copy-id username@server_ipStep 5: Configure SSH for Easier Access
To streamline connections, you can create an SSH config file:
- Navigate to C:\Users\YourUsername\.ssh\ and create a file named config (no extension).
- Add the following content to the config file:
Host myserver HostName server_ip User username IdentityFile ~/.ssh/id_rsa - Save the file and set permissions:
icacls "C:\Users\YourUsername\.ssh\config" /inheritance:r icacls "C:\Users\YourUsername\.ssh\config" /grant:r "%username%:F"
Now, connect to the server using:
ssh myserverStep 6: Connect to a Remote Server
To connect to a remote server, use the SSH command:
ssh username@server_ip- Replace username with your remote server username.
- Replace server_ip with the server’s IP address or hostname (e.g., 192.168.1.100 or example.com).
If you set up SSH keys, you won’t need a password. Otherwise, enter the password when prompted.
Step 7: Test and Troubleshoot
- Test the connection: Ensure you can log in without issues.
- Common issues:
- “Connection refused”: Verify the server is running an SSH service (usually on port 22).
- “Permission denied”: Check your username, password, or SSH key setup.
- “Command not found”: Ensure OpenSSH is installed correctly.
- For troubleshooting, refer to this Microsoft SSH documentation.
Step 8: Optional – Use Third-Party SSH Clients
If you prefer a graphical interface, consider third-party tools like:
- PuTTY: A lightweight SSH client. Download from putty.org.
- MobaXterm: A feature-rich terminal with a free version. Download from mobaxterm.mobatek.net.
For a tutorial on using PuTTY, watch this YouTube guide.
Conclusion
You’ve now learned how to install and use SSH on Windows, from setting up OpenSSH to connecting to a remote server. Whether you use the built-in OpenSSH client or a third-party tool like PuTTY, SSH is a powerful way to manage remote systems securely.
For further reading, check out:
- Official OpenSSH documentation
- Guide to SSH on Windows

Nice one